This article shows you step-by-step how to setup RPA for Python, or TagUI-Python, which I still like to call it because I started from the TagUI days. You can refer to the details of the name change here.
To a technical person, setting up TagUI-Python is easy, just a simple
pip install tagui
However, to someone who has never used python or pip before, it's surprisingly complicated, as it includes the following 4 main steps on Windows 10:
- Install Python
- Add Python to System’s PATH Variable
- Install TagUI-Python
- Install additional DLL if necessary
If you are on Mac, please refer to my other article: Setup TagUI-Python on Mac.
Let me walk through the details with you.
Step 1. Setup Python
First, let's make sure that you have Python installed on your machine.
- Press the
Winkey to start a search, then type python. - If you see something like the screen below, click "Python 3.8 (32-bit)".
Note: I'm using Python 3.8, so it shows Python 3.8. Your Python version might be e.g. 3.5, 3.6 or 3.7. All the sample codes on this websites are using Python 3. As long as it's Python 3 and above, it's ok. - If you see the screen below, then you have Python installed on your machine.
- If you DO NOT see the screen above, or the Windows search did not return anything when you search for Python, then please follow the instructions in the article "Install Python on Windows 10" to install Python.


Step 2. Add Python to System’s PATH Variable
We want to add the Python path to system PATH variables so that we do not need to use the full paths everytime we want to run Python.
First, let's check if the Python folder is already added to the System’s PATH Variable.
- Type
Win+R, followed by cmd as shown below: - In the command prompt, type python and press
Enter - If you see the screen below, then you have already added Python to System’s PATH Variable. Please move on to Step 3.
- If you see the following screen instead, it means Python is not set in the System’s PATH Variable yet. Please continue with the following steps:
- To add the path, we need to first find out where are your Python installed on your machine. Again, start your python following Step 1.1 and 1.2 above. Once you are in Python, type the following:
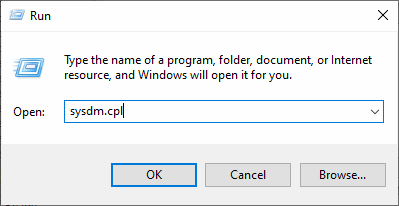
- Type
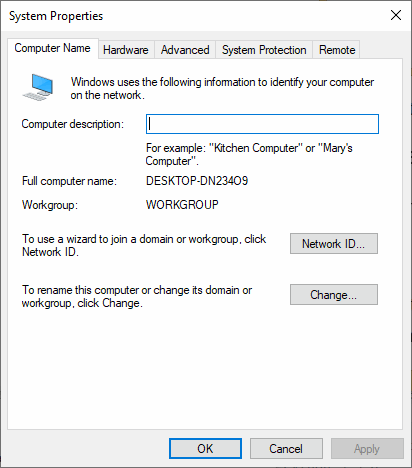
Win+R, followed by sysdm.cpl as shown below: - You will see the following System Properties:
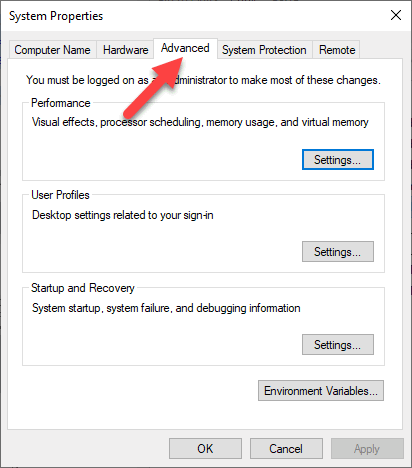
- Click the
Advancedtab: - Then click the
Environment Variablesbutton .
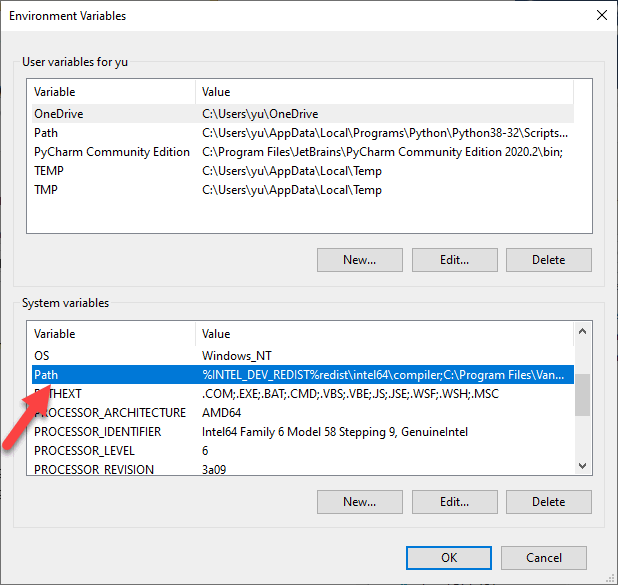
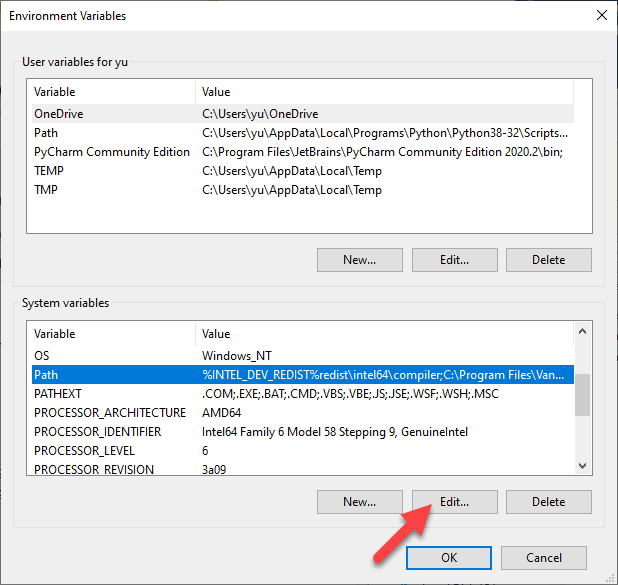
- Under
System Variables, find and select thePathvariable. - Click the
Editbutton. - Click the
Newbutton. You will see a new entry inserted at the last row: - Now paste the location of your Python here - the one which you have retrieved from 2.5 above.
- Click the
Newbutton one more time. - Suppose your Python path is: C:\Users\your_name\AppData\Local\Programs\Python\Python38-32
You need to add one more: C:\Users\your_name\AppData\Local\Programs\Python\Python38-32\Scripts, i.e. with a \Scripts appended at the back. - Your final System Path variables will look like the following with 2 additional paths added. Your paths will be different from mine because the location of your Python files are different on your machine.
- Click the
OKbutton, followed by 2 moreOKbuttons, and you're done setting up the System’s PATH Variable. - Now follow 2.1, 2.2 and 2.3 above, open a fresh command prompt, type python, and see if you see the screen below.
Note: Make sure that you open a new command prompt so that your newly added System's PATH Variable will be loaded. - Press
Ctrl+Zto exit the Python Interpreter and go back to the command prompt. Now type pip list and see if you get something similar to the following: - If you get the following error message instead, then it means you did not add the second PATH variable correctly. Please go back to 2.15 to make sure that you have added the right path with the \Scripts appended at the back of the Python location.
- We are now ready to install Tagui-Python!


import sys
print(sys.exec_prefix)
You will see the location of your Python printed as follows. Please highlight and make a copy of this folder.


Note: There's also a Path under User variables on top. Please don't select that one. Select the System variables below.


Step 3. Install Tagui-Python
Make sure that you have followed Step 2 above to add Python to the System’s PATH Variable.
- Open a command prompt and type:
- If everything ok, you will see the following message:
- If you get the following error message instead, then it means you did not add the second PATH variable correctly. Please go back to 2.15 to make sure that you have added the right path with the \Scripts appended at the back of the Python location.
pip install tagui


Step 4. Setup Tagui-Python
- First, make sure you have Google's Chrome browser installed. TagUI-Python is designed to run best with Google Chrome browser.
- Start your Python in a command prompt following Step 1.1 and 1.2 above. Once you are in Python, type the following:
- You will first see an empty Chrome browser appeared:
- If everything is ok, you will also see a True in the Python window as shown below:
- Now copy and paste the following commands into the Python window:
- If you see something similar to the following output, then your TagUI-Python is up and running!
- Congratulations! You have successfully installed and setup TagUI-Python!
If you do not have Google Chrome browser, click the following link to install Google Chrome browser before you proceed: Install Google Chrome broswer
import tagui as t
t.init()


Note that if this is the first time you run TagUI, it might take all the way from a couple of seconds to a few minutes for the True to appear. Just be patient and wait for True to appear.
If the True did not appear after 10 minutes, please close the command prompt, restart a new command prompt and then go back to Python again. Repeat the previous step to key in the 2 commands, i.e. import tagui as t followed by t.init().
If you do not see True, or you see a False instead, please refer to Troubleshooting below.
t.url('https://google.com')
t.type('//input[@name="q"]', "weather singapore[enter]")
temp = t.read('//span[@id="wob_tm"]')
print("temperature = " + temp)

On the browser side, you will see TagUI automatically open the Google search page, enter weather singapore in the search field, press the Enter key, grab the current temperature from the search result, and display the temperature in the Python window. Your final browser window will look like the following:

Troubleshooting
1. MSVCR110.dll is missing from your computer
If you get the following error message:
“The program can't start because MSVCR110.dll is missing from your computer.”
You need to download and install a library from Microsoft: Visual C++ Redistributable for Visual Studio 2012 Update 4
Make sure you install the x86 version, even if you are running a 64-bit OS. Behind the scene, TagUI runs some PHP scripts, and the PHP scripts uses some of the 32-bit libraries.

Details of this problem and solution here: MSVCR110.dll is missing from your computer
2. Space in your Windows user name
If you get the following error message:
“[TAGUI][INFO] - to use TagUI for Python on Windows, avoid space in folder path name”
As explained by the developer of TagUI,
"There is a limitation in the CasperJS / PhantomJS components of TagUI and thus folders with spaces is not able to work correctly on Windows. "And the solution for now:
Try running from another user account without space in the user name
Details of this problem and solution here: Issue of space in username or folder name - use another folder or acct
Comments (0)